Unity 3D: Creating colorful gradient-based fog
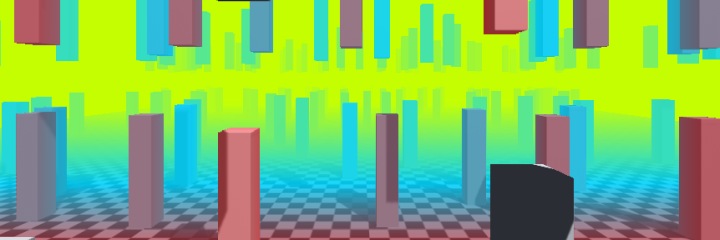
I wanted to create fog that would change it’s color with on the distance from the camera. My plan was to create post-processing effect that would allow me to define a gradient with various values for color and transparency at different distances. Final effect was supposed to look like this:
TL;DR
This tutorial is tested with Unity 5.5. You will find full working source code for this tutorial in this GitHub repository.
The plan
- Utilise camera’s depth texture as source of information about distance from the eye. This can be generated by Unity automatically.
- Create C# Image effect. It will process camera-generated image by applying fog color to pre rendered pixels.
- Create custom shader that will turn raw camera image to the one with the fog.
- Use built-in gradient editor to control fog density (alpha) and color.
The execution
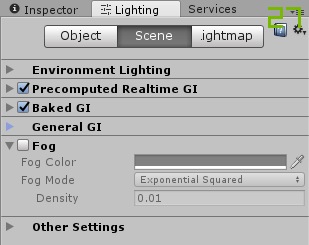
1. Turn off standart fog if you have it enabled.
In the Lighting window you will find section named “Fog”. Disable it.
2. Create C# script
Add new C# file to you project. This is the class where we’ll write the immage effect for the fog. It should look like this:
public class FogEffect : MonoBehaviour
{
    void Awake ()
    {
		// called on script load
        // see https://docs.unity3d.com/ScriptReference/MonoBehaviour.Awake.html
	}

	void OnValidate ()
	{
		// called when some editor value is changed
        // see https://docs.unity3d.com/ScriptReference/MonoBehaviour.OnValidate.html
	}

	void OnRenderImage (RenderTexture source, RenderTexture destination)
	{
    	// copy source to destination without any changes
		Graphics.Blit(source, destination);
	}
}
Assign the effect class to your camera. At this stage the effect does not apply any changes in the rendered frame so you should be able to just start the Game and see everything as it was before.
3. Create Shader
Add new Shader to your project:
Shader "Custom/FogEffect" {
	Properties {
		_MainTex ("Scene (RGB)", 2D) = "white" {}
	}
	SubShader {
		Pass{
			CGPROGRAM
			#pragma vertex vert_img
			#pragma fragment frag
			#include "UnityCG.cginc"

			uniform sampler2D _MainTex;

			half4 frag (v2f_img i) : COLOR{
			   float4 scene = tex2D(_MainTex, i.uv);

			   half4 result;
			   result.rgb = scene.rgb;
			   result.a = 1;
			   return result;
			}
			ENDCG
		}
	}
}
At the moment the shader just renders _MainTex on the given geometry. Let’s use it in out fog effect. Update the FogEffect C# code:
private Material fogGradientMaterial;

void OnValidate ()
{
	fogGradientMaterial = new Material( Shader.Find("Custom/FogEffect") );
}

void OnRenderImage (RenderTexture source, RenderTexture destination)
{
	Graphics.Blit (source, destination, fogGradientMaterial);
}
If everything goes well, then you should still be able to run your project without seeing any changes in the rendered frames. The difference this time is that Graphics.Blit (source, destination, fogGradientMaterial) calls our shader to process the frame. It assigns _MainTex with source RenderTexture and fragment shader outputs it to the destination RenderTexture.
4. Use depth buffer in the shader
Let’s update the shader to output depth buffer image instead of the scene image:
half4 frag (v2f_img i) : COLOR{
float2 invertedUv = float2(i.uv[0], 1.0-i.uv[1]); // the depth texture has inverted vertical coordinate
float4 scene = tex2D(_MainTex, i.uv);
float4 depth = tex2D(_CameraDepthTexture, invertedUv);
float depthValue = depth.r; // the depth is encoded as red color
half4 result;
result.rgb = depthValue; // assign depthValue to all color channels retulring in grayscale image
result.a = 1;
return result;
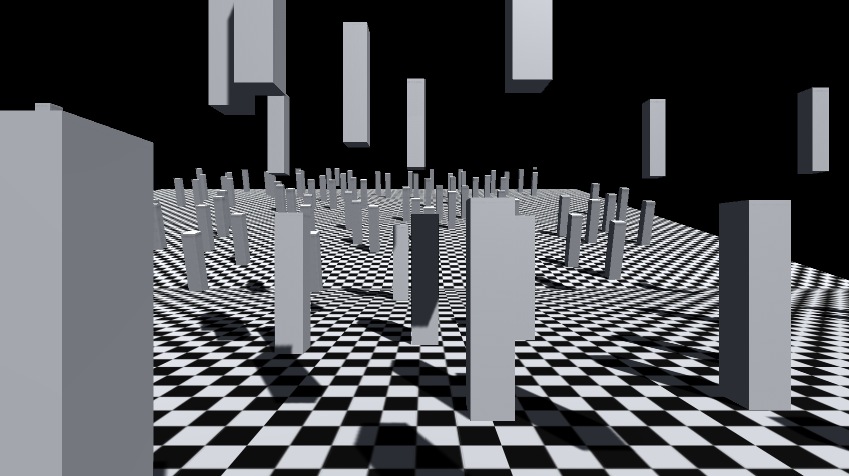
}
This is the moment when interesting things start to happen. You should see depth information rendered instead of your image: